Step-by-Step Guide to Build, Train & Deploy ML Models with Custom Vision
Artificial Intelligence (AI) and Machine Learning (ML) are more than just buzzwords. Every day these technologies fuel advancements that impact our lives, optimize and automate operations, and help make business decisions---especially under the threat of COVID-19. Azure Cognitive Services allows developers to transparently build AI and ML into their applications.
In this article, I am going to walk you through how to build, train, and deploy a basic Machine Learning model using the Microsoft Azure Custom Vision toolkit. Whether you are looking to optimize the workflow of your organization, or simply expand your knowledge of AI, understanding the background of how ML operates is valuable. Below, I will walk you through an example of an end-to-end machine learning classification project using the Azure Cognitive Services Custom Vision portal.
Prepare Your Machine Learning Data
This example will be built from 40 images. We will use 20 images of lemons and 20 images of limes. I randomly selected 20 of each class using Google's popular Image Search and saved them into two separate folders in advance.
Training the custom vision algorithm has a limitation of 4mb per file. Restricting a jpeg to a maximum of 4,000 pixels in either direction should work for most scenarios.
Build Machine Learning Models with Custom Vision
To start, we will head over to https://customvision.ai. I will sign in with my Microsoft credentials, bringing me to the projects landing page. Once there, we will walk through the steps outlined below.
- Click on New Project

- Give your project a Name and Description, then assign/create a Resource. In this example we’ll be creating a Multiclass Classification project in the Food Domain.

- Next we’ll add our 40 image training data and assign the tags to each class.

- Select all images from a Class.

- Create a Tag.

- And then upload your images. Repeat this process with your other class.

Train Machine Learning Models with Azure Custom Vision
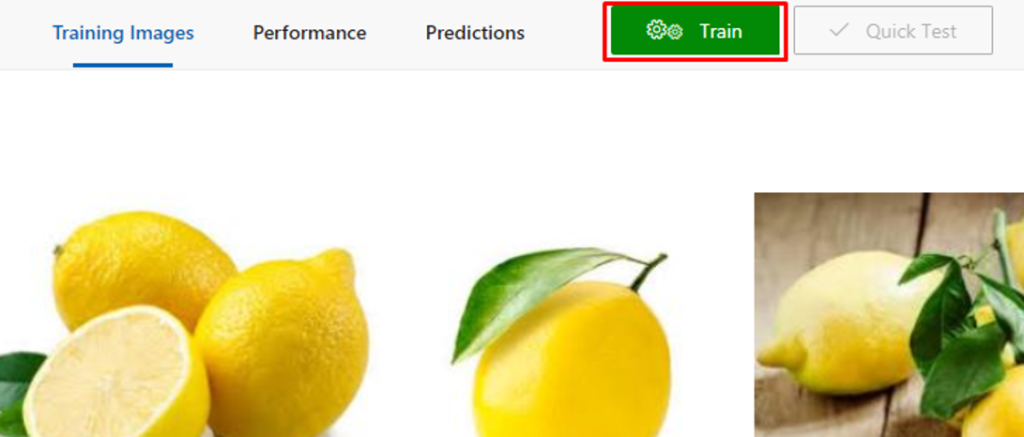
Now we have all the data we need to train this model. Select Train at the top of the screen and select Quick Training.
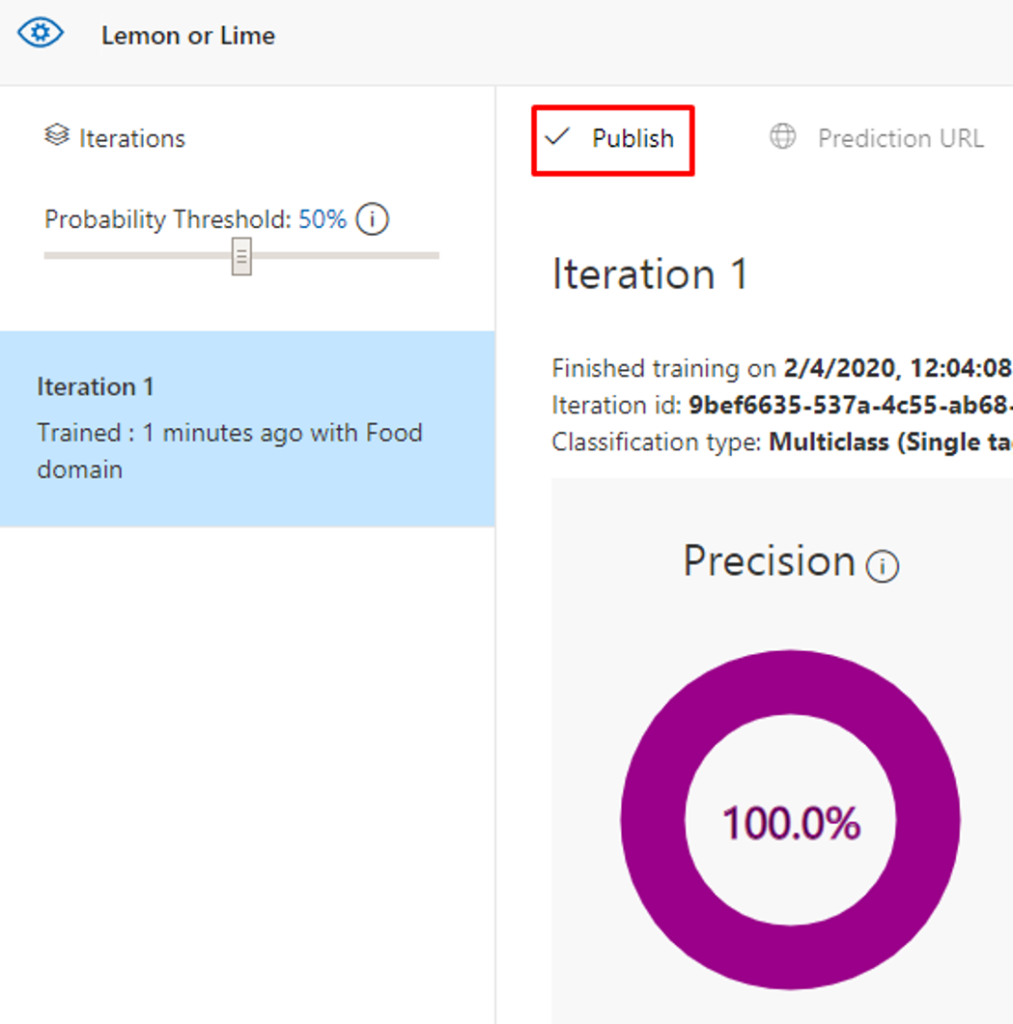
After a few moments your model will be trained and ready for you to call it through an API, but first we need to Publish the trained model.
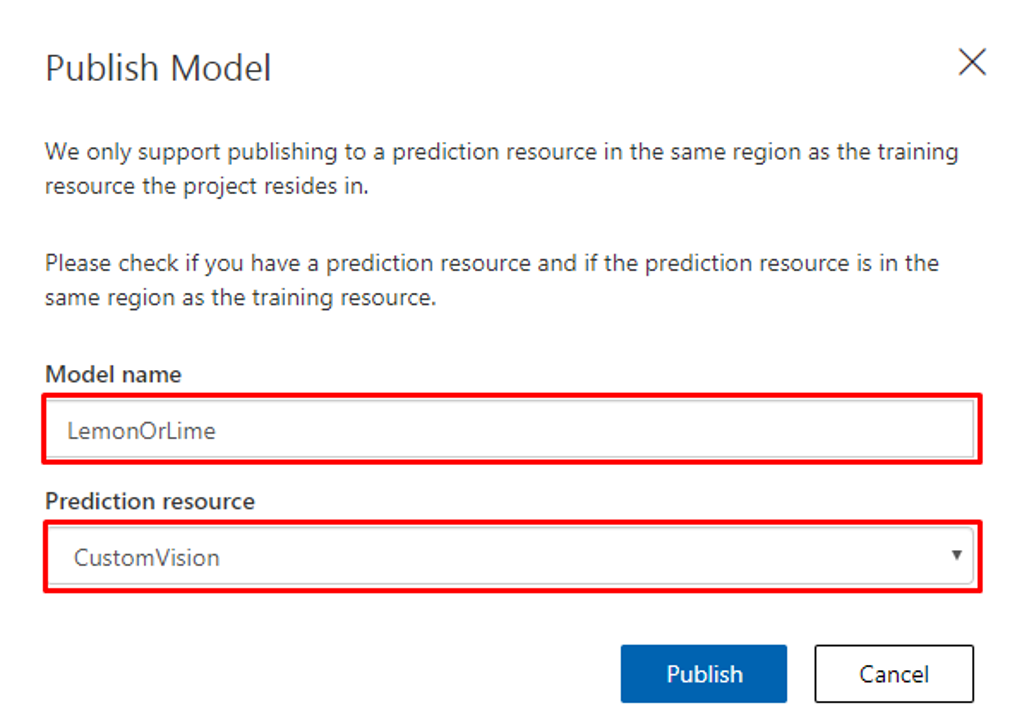
Choose a Model Name and Prediction Resource.
You can then click on Prediction URL to obtain your Prediction Key and Endpoint which you'll need in the final step.

Deploy Machine Learning Models with Custom Vision
Save the code below to a file named LemonOrLime.html and edit lines 15 and 16 to reflect your Subscription Key and Endpoint.
<!DOCTYPE html>
<html>
<head>
    <title>Lemons or Limes</title>
    <script src="https://ajax.googleapis.com/ajax/libs/jquery/1.9.0/jquery.min.js"></script>
</head>
<body>

<script type="text/javascript">
    function processImage() {
        // **********************************************
        // *** Update or verify the following values. ***
        // **********************************************

        let subscriptionKey = 'INSERT YOUR KEY HERE';
        let endpoint = 'INSERT YOUR ENDPOINT URL HERE';
        if (!subscriptionKey) { throw new Error('Set your environment variables for your subscription key and endpoint.'); }

        // Display the image.
        var sourceImageUrl = document.getElementById("inputImage").value;
        document.querySelector("#sourceImage").src = sourceImageUrl;

        // Make the REST API call.
        $.ajax({
            url: endpoint + "?",

            // Request headers.
            beforeSend: function(xhrObj){
                xhrObj.setRequestHeader("Content-Type","application/json");
                xhrObj.setRequestHeader("Prediction-Key", subscriptionKey);
            },

            type: "POST",

            // Request body.
            data: '{"url": ' + '"' + sourceImageUrl + '"}',
        })

        .done(function(data) {
            // Show formatted JSON on webpage.
            $("#responseTextArea").val(JSON.stringify(data, null, 2));
        })

        .fail(function(jqXHR, textStatus, errorThrown) {
            // Display error message.
            var errorString = (errorThrown === "") ? "Error. " :
                errorThrown + " (" + jqXHR.status + "): ";
            errorString += (jqXHR.responseText === "") ? "" :
                jQuery.parseJSON(jqXHR.responseText).message;
            alert(errorString);
        });
    };
</script>

<h1>Analyze image:</h1>
Enter the URL to an image, then click the <strong>Analyze image</strong> button.
<br><br>
Image to analyze:
<input type="text" name="inputImage" id="inputImage"
    value="https://cdn.shopify.com/s/files/1/2336/3219/products/shutterstock_336818993meyer_x850.jpg" />
<button onclick="processImage()">Analyze image</button>
<br><br>
<div id="wrapper" style="width:1020px; display:table;">
    <div id="jsonOutput" style="width:600px; display:table-cell;">
        Response:
        <br><br>
        <textarea id="responseTextArea" class="UIInput"
                  style="width:580px; height:400px;"></textarea>
    </div>
    <div id="imageDiv" style="width:420px; display:table-cell;">
        Source image:
        <br><br>
        <img id="sourceImage" width="400" />
    </div>
</div>
</body>
</html>
Run the html file in your web browser and click analyze to use my default image, or change the URL to any target image.
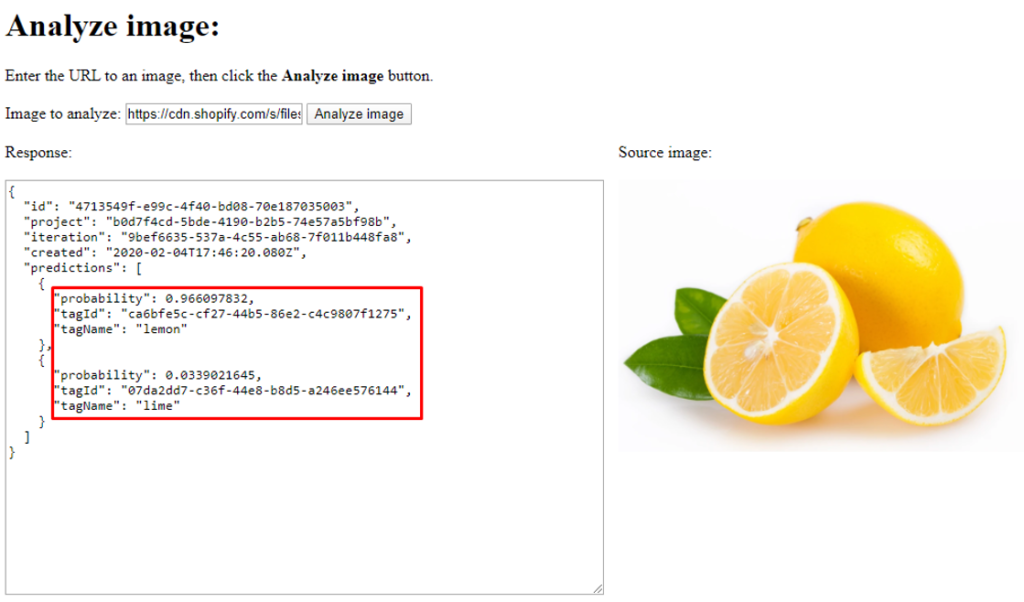
Above you can see in the results that the model predicted there is a 97% probability that the image is of lemons, and a 3% probability that the image is of limes.
Closing Thoughts on How to Build, Train & Deploy Machine Learning Models with Custom Vision
This is, of course, the tip of the iceberg but it gives you a general idea of the power and flexibility of Machine Learning. Custom Vision is also able to detect objects in pictures and give you an accurate count in any given picture. Perhaps my next blog will be focused on object detection for Where’s Waldo…
In the meantime, you can check out how an intern and I configured a machine to beat a level of Super Mario Bros, or how GPT-3 is making natural language processing more capable than ever.
And if you're interested in learning more about Azure Cognitive Services or DevOps, contact us in the form below! Also head over to our AI & Machine Learning page put together by our newest team member Melissa Crouch.
Stay connected. Join the Infused Innovations email list!
Share this
You May Also Like
These Related Posts
Step-by-Step Guide to Deploy Microsoft Sentinel
Step-by-Step Guide to Configure Valimail for DMARC Monitoring With Office 365 and Azure SSO
No Comments Yet
Let us know what you think